e2e nestjs 测试教程
Author: Housu Zhang
规范
- 最外层 describe 的 names 首字母大写,如 'NFT', 'Collection', 其他 describe 都小写。
- 每个内部的 describe 测试一个函数 api。
- it 的描述中,最后加上用 /(方法): 期望返回的 status。
example:
describe("NFT", () => {
  describe("my-nfts", () => {
    it("It should get a NFT /(GET): 200", async () => {
      // 测试用例
    });

    it("It should return 400 when get a NFT unsuccseefully /(POST): 400", async () => {
      // 测试用例
    });
  });
});
前期准备
- jest 包在我们组织下的 package 中已经存在了,只需要通过 github token 认证你的 github 账号即可使用组织下的 package。
- 配置 github token:在 github 网页中的 setting 处,下载你自己的 token (只需要 package read 权限即可)。然后运行
export GITHUB_TOKEN=your_token进行配置。 - 通过 pnpm 来更新咱们的 node。
pnpm i
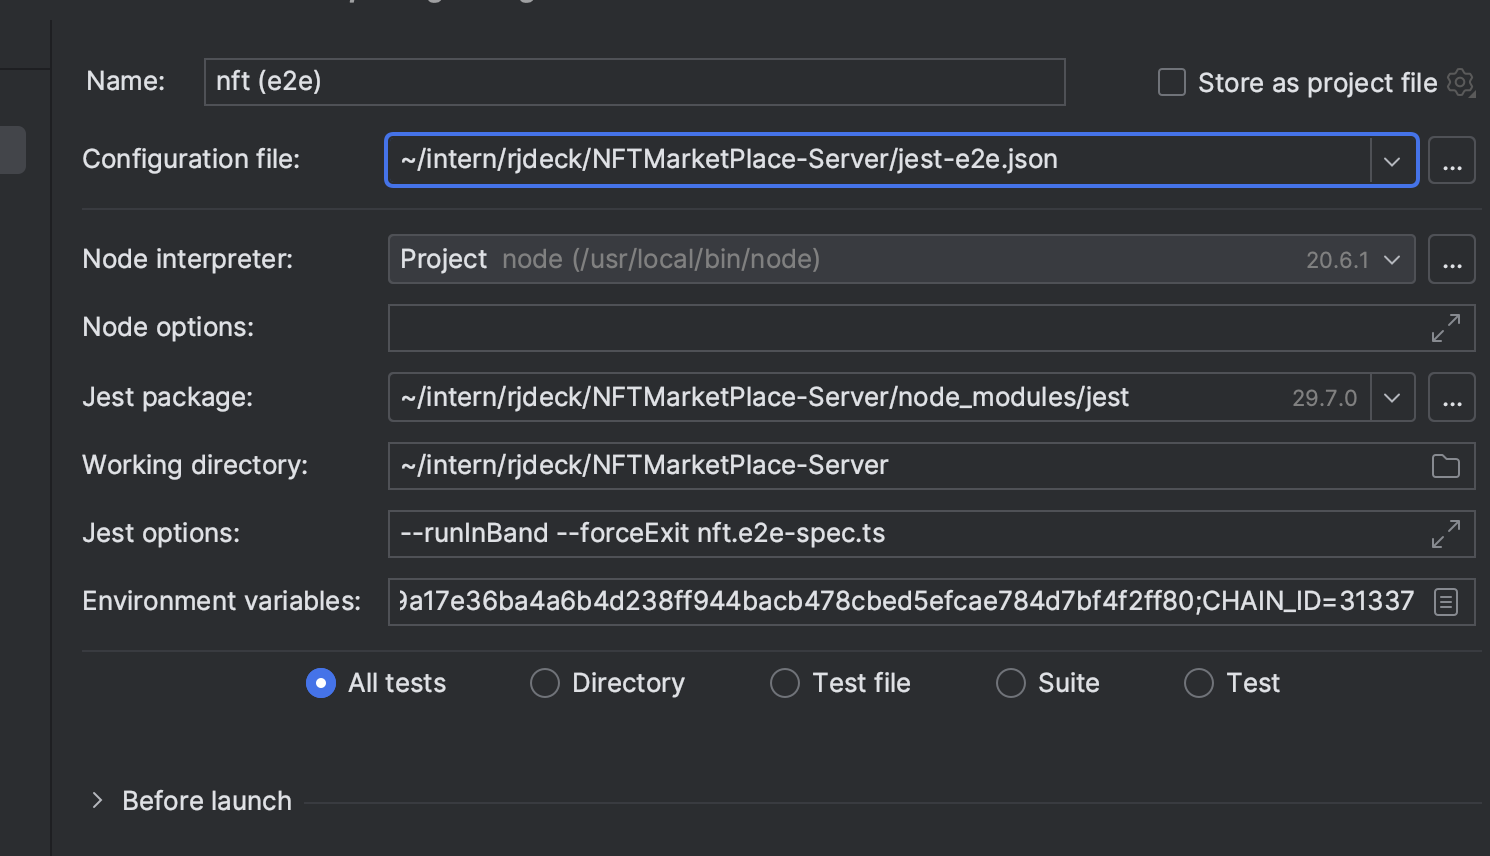
- configuration 配置。配置 Configuration file 为项目中的 jest-e2e.json,配置必要的环境变量。

- 对于我们的某些项目,我们测试的时候需要一些镜像,服务要在本地启动。具体情况具体操作。如 NFTMarketPlace-Server 中,我们需要在开启本地链,启动 docker 的情况下测试。
通过
pnpm blockchain:up启动测试链,通过pnpm docker:up启动 docker 镜像。如果缺少本地链,会发生AggregateError。如果没有启动 docker,会出现 `ERROR [RedisModule]
测试钩子(hook)介绍
beforeAll
在 beforeAll 中,我们一般放入启动项目的逻辑,如环境变量的 mock,prisma 初始化,app 启动等等。例如:
beforeAll(async () => {
  class MockConfigService {
    config: { [key: string]: any } = {
      PORT: parseInt(process.env.PORT) || 3340,
      HOST: process.env.HOST || "localhost",
      // other code
      // ...
      JWT_SECRET: "test",
    };
    setConfig({ key, value }: { key: string; value: any }) {
      this.config[key] = value;
    }
    onInit = jest.fn().mockImplementation(() => {});
  }

  // use in-memory mongodb
  mongod = await MongoMemoryReplSet.create({
    replSet: { count: 1, storageEngine: "wiredTiger" },
  });

  process.env.DATABASE_URL = mongod.getUri("test");

  // create a mock redis client
  const moduleFixture: TestingModule = await Test.createTestingModule({
    imports: [AppModule],
  })
    .overrideProvider(CONFIG_SERVICE_TOKEN)
    .useClass(MockConfigService)
    .overrideProvider(FirebaseService)
    .useValue({
      initApp: jest.fn().mockImplementation(() => {}),
    })
    .compile();

  client = moduleFixture.get<Redis>(getRedisToken("default"));
  configService =
    moduleFixture.get<ConfigService<IAppConfig>>(CONFIG_SERVICE_TOKEN);
  configService.setConfig({ key: "JWT_SECRET", value: "test" });
  jwtService = moduleFixture.get(JwtService);

  // create a nest app and use cookie parser as middleware
  app = moduleFixture.createNestApplication();
  app.use(cookieParser());
  await app.init();
});
beforeEach
beforeEach 意在将的作用是在每个测试案例(test case)开始之前执行一些代码。 这通常用于准备测试环境,确保每个测试都是在相同的条件下开始的。减少重复的代码逻辑。
例如:将每次测试会用到的测试数据写入测试数据库的操作,可以放到 beforeEach 中,减少冗余。
beforeEach(async () => {
  const data1 = {
    name: "NFTContract1",
    description: "Test contract description",
    sourceCode: "test",
    solidityVersion: "0.8.18+commit.87f61d96",
    abi: JSON.stringify([]),
    bytecode: JSON.stringify("0x1234"),
  };
  const data2 = {
    name: "NFTContract2",
    description: "Test contract description",
    sourceCode: "test",
    solidityVersion: "0.8.18+commit.87f61d96",
    abi: JSON.stringify([]),
    bytecode: JSON.stringify("0x1234"),
  };
  const data3 = {
    name: "NFTContract3",
    description: "Test contract description",
    sourceCode: "test",
    solidityVersion: "0.8.18+commit.87f61d96",
    abi: JSON.stringify([]),
    bytecode: JSON.stringify("0x1234"),
  };

  await prismaService.nftContract.create({ data: data1 });
  await prismaService.nftContract.create({ data: data2 });
  await prismaService.nftContract.create({ data: data3 });
});
afterAll
在所有测试案例执行完毕后运行一次。它用于执行清理任务,如断开数据库连接或清理测试后的状态。
例如,关闭各种服务(对应 beforeAll 中开启的服务)
afterAll(async () => {
  await app.close();
  await mongod.stop();
  await prismaService.$disconnect();
});
afterEach
在每个测试案例执行后运行。它通常用于清理测试案例可能创建的任何副作用,例如删除临时文件或关闭数据库连接。
afterEach(async () => {
  await prismaService.nftContract.deleteMany({});
  await prismaService.nonce.deleteMany({});
});
tips
only 字段
因为我们的测试往往依赖于配置的环境变量,因此 webstorm 提供的运行单独测试的按钮一般是不能成功的。In this scenario, 我们可以通过 only 字段来单独运行某一个 describe 或者 it。
例如:
describe.only("this is a test describe", () => {
  // XXX
});

it.only("this is a test it /(GET) 200", () => {
  // XXX
});
skip 字段
有些时候,因为一些其他因素(服务挂了),有的测试会挂掉。这个时候我们可以用 skip 字段跳过这些测试,保持好心情。
例如:
describe.skip("this is a test describe", () => {
  // XXX
});

it.skip("this is a test it /(GET) 200", () => {
  // XXX
});
mock
在 NestJS 项目中使用 Jest 进行测试时,经常需要对依赖项进行模拟(mocking)。这可以帮助我们隔离测试的部分,以确保单元测试只关注当前组件的行为。以下是使用 Jest 进行模拟的常用方法和示例。
Mocking Modules
在 NestJS 中,你可能需要模拟整个模块。Jest 提供了 jest.mock() 函数来实现这一点。
// my.module.ts
jest.mock("./my.module", () => {
  return {
    MyService: jest.fn().mockImplementation(() => {
      return {
        myMethod: jest.fn().mockReturnValue("mocked value"),
      };
    }),
  };
});
mocking function
有时候,你只想模拟一个特定的函数,而不是整个类。你可以使用 jest.spyOn() 和 mockImplementation() 或 mockReturnValue() 来实现。
jest.spyOn(myFunctions, "myFunction").mockReturnValue("mocked value");
测试用例
it 和 test
it 是一个函数,用于定义一个测试用例。它是 test 函数的别名,所以 it 和 test 在功能上是等价的,都用于编写单个的测试块。每个 it 或 test 块描述了一个特定的测试场景,并包含了执行该场景所需的测试代码。
这里是 it 函数的基本结构:
it("should do something /(GET): 200", () => {
  // 测试代码
});

test("should do something /(POST): 201", () => {
  // 测试代码
});
实战例子:
contract e2e 测试
// 各种import
import { Test, TestingModule } from "@nestjs/testing";
// ...
// mock solc
jest.mock(
  "../src/contract/solc",

  () => ({
    Solc: jest.fn().mockImplementation(() => ({
      loadRemoteCompiler: jest.fn().mockResolvedValue({
        compile: jest.fn().mockReturnValue(
          JSON.stringify({
            contracts: {
              "NFTContract.sol": {
                NFTContract: {
                  evm: {
                    bytecode: {
                      object: "0x1234",
                    },
                  },
                  abi: [],
                },
              },
            },
          })
        ),
      }),
    })),
  })
);

describe("Contract", () => {
  let app: INestApplication;
  let prismaService: PrismaService;
  let mongod: MongoMemoryReplSet;

  beforeAll(async () => {
    // use in-memory mongodb
    mongod = await MongoMemoryReplSet.create({
      replSet: { count: 1, storageEngine: "wiredTiger" },
    });

    process.env.DATABASE_URL = await mongod.getUri("test");
    class MockConfigService {
      config: { [key: string]: any } = {
        PORT: parseInt(process.env.PORT) || 3340,
        // 超多东西,懒得写
      };
      onInit = jest.fn().mockImplementation(() => {});
    }
    const moduleFixture: TestingModule = await Test.createTestingModule({
      imports: [AppModule],
    })
      .overrideProvider(FirebaseService)
      .useValue({
        initApp: jest.fn().mockImplementation(() => {}),
      })
      .overrideProvider(CONFIG_SERVICE_TOKEN)
      .useClass(MockConfigService)
      .compile();

    // create a nest
    app = moduleFixture.createNestApplication();
    await app.init();

    prismaService = moduleFixture.get<PrismaService>(PrismaService);
  });

  describe("create", () => {
    // 成功的情况
    it("should create a new contract /(POST): 201", async () => {
      const data = {
        name: "NFTContract",
        description: "Test contract description",
        sourceCode:
          '// SPDX-License-Identifier: GPL-3.0\\npragma solidity ^0.8.0;\\n\\ncontract NFTContract {\\n    string public message = \\"Hello, World!\\";\\n}',
        solidityVersion: "0.8.18+commit.87f61d96",
      };

      await request(app.getHttpServer())
        .post("/contract/create")
        .send(data)
        .expect(201)
        .expect((res) => {
          expect(res.body).toHaveProperty("id");
          expect(res.body.name).toBe(data.name);
          expect(res.body.description).toBe(data.description);
          expect(res.body.sourceCode).toBe(data.sourceCode);
          expect(res.body.solidityVersion).toBe(data.solidityVersion);
          expect(res.body).toHaveProperty("abi");
          expect(res.body).toHaveProperty("bytecode");
        });
    });

    // 不成功的情况
    it("should not create contract with wrong name /(POST): 400", async () => {
      const data = {
        name: "NFTContract1",
        description: "Test contract description",
        sourceCode:
          '// SPDX-License-Identifier: GPL-3.0\\npragma solidity ^0.8.0;\\n\\ncontract NFTContract {\\n    string public message = \\"Hello, World!\\";\\n}',
        solidityVersion: "0.8.18+commit.87f61d96",
      };

      await request(app.getHttpServer())
        .post("/contract/create")
        .send(data)
        .expect(400);
    });
  });
});